

|
"100+ Auto-Installing Software Titles For Your Web Site"
|
Wednesday, June 24, 2026
Installation is the same as WebChatter. The COMPILED version of WebChatter 6.1 comes with WebChatter LIVE also.
Login Screen: (Click To Englarge)
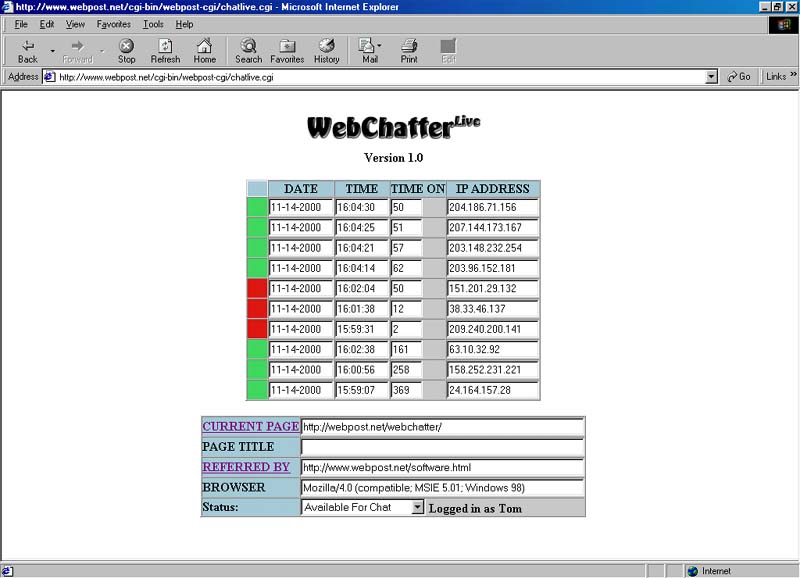
Status Lights:
 User is active on your web site
 User is no longer on your web site
 User would like to chat with you
 You are paging the user for chat (click a green square to page)
When you are available to chat, users will see this logo on your web site:

When you are not available, users will see this logo on your web site:

Using Live Web Page Chat:
WebChatter LIVE allows you to chat instantly with users that are on your web site.
To enable your site to chat with live visitors, simply place this code on your web pages:
<CENTER><br>
<SCRIPT LANGUAGE="JavaScript" SRC="http://yourserver.com/cgi-bin/chatlive.cgi?gname=account_name"><br>
</SCRIPT><br>
</CENTER><br>
Just use your web site URL and replace account_name with the account name that you want associated with this web site. Be sure you have
registered this user in the WebChatter login section.
To login to the account, simply point your web browser to:
http://yourserver.com/cgi-bin/chatlive.cgi?area=login
The login screen will show up to 10 of your site visitors at one time. You can also have up 10 different
people logged into the same account to have more support for your web site. Just be sure that each user logs in under a different name.
Customizing WebChatter LIVE Graphics:
There are four graphics files that WebChatter LIVE uses to distinguish when an operator is available to chat with:
chat_live.gif, chat_live_invalid.gif, chat_live_email.gif, chat_live_join.gif, and they are all
stored in the subdirectory, webchatter_graphics.
All of the below graphic files can have any width size. The height determines what the chatlive.cgi program should do.
chat_live.gif tells the user that there is an operator available to chat with. The height must be 60 pixels
chat_live_invalid.gif displays if an invalid account name is used to call the chatlive.cgi program from a web page. The height must be less than 58 pixels
chat_live_email.gif will be shown if there is no operator available to chat with. The height must be 58 pixels
chat_live_join.gif will scroll across the screen when an operator pages the user on the web site. The height must be 59 pixels
For paid versions of WebChatter LIVE, you can replace the webchatter_live_logo.gif with your own custom logo, instead of pointing to the Web Post Network web site.
If you are familiar with JavaScript, you may want to create your own games! There are several things to know first:
- Games can only work in Realtime mode
- All games are standard HTML & JavaScript files (except a few header lines) but with a .game extension
- When referencing the game window, always use: games1.game.document
- All games require four form elements (form name, data variable, start variable, turn variable:
<FORM NAME="gamename">
<INPUT TYPE=hidden NAME=data>
<INPUT TYPE=hidden NAME=start value="0">
<INPUT TYPE=hidden NAME=turn value="$first_player">
</FORM>The only value you should change above is the form name. The rest should appear exactly how you see them.
The data variable is passed back and forth to both browsers during each turn and is appended to each time. For example, when player one moves, and your game piece is in position #5, the data variable will be 5-1. This means position 5, player 1. Now when player two moves, and the game piece is in position #6, the data variable will be 5-1,6-2. You are not required to pass any information to this variable, but it is useful if needed.
The start variable should always be predefined to 0 (zero). Set it to 2 when both players have joined. And when a player has won, it is set to 1 automatically. To tell the game program that a user has won, pass the variable won (shown below) with a value of 1. If the game is a draw, pass with a value of 2. Otherwise the variable won should contain nothing -- not even zero.
The turn variable tells the game who's turn it is. It should always be set opposite to the user who's turn it currently is. In your game, you should generally use turn=$user2. This will automatically determine the opponent's player number.
When a player moves, you should always call this:
parent.submit.document.location.href = "$games?session=$session&player=$player" + "&data=" + your_variable + "&area=submit" + "&turn=" + user2 + "&user=" + user + "&won=" + won + "&piece=" + piece + "&game=$game";
The only thing that will change in the above line is the JavaScript variable your_variable. This is anything that should be sent to the other player's browser that will tell them which spot was chosen. This will be sent to the form element data as described above. The rest of the information will be filled in automatically by the game program. However, be sure to define the following exactly as shown below:
var user = $user;
var user2 = $user2;
var piece = "$piece";
var won = "";
The variables above are automatically filled in by the game program.
- Lines 1 - 9 are required for the game to communicate between players
Line #1: Defines how you want the game window displayed. Works just as if you were to use the JavaScript window.open object.
Eg. width=400,height=475,resizable=0
This makes the game window a size of 400x475 and does not allow it to be resized
Line #2: Defines the default game piece for player one
Line #3: Defines the default game piece for player two
Line #4: This line generally should be all JavaScript and will be sent to player 2's browser each time player 1 makes a move
Line #5: This line generally should be all JavaScript and will be sent to player 1's browser each time player 2 makes a move
Line #6: Sent to player 1's browser when either player has won
Line #7: Sent to player 2's browser when either player has won
Line #8: Sent to both player's browser when neither has won
Line #9: Sent to both player's browser when both have joined the game
After Line #9, you can either define custom variables, or place a space between those lines and your game coding. An example of a custom defined variable is:
blackChecker=$main_url/webchatter_graphics/blackchecker.gif
This would be on Line #10 if you were to define it. To have your program output it, just call it as $blackChecker in your game code. For example:
<IMG SRC="$blackChecker">
When your game is loaded, the above line will actually be:
<IMG SRC="http://yourserver.com/webchatter_graphics/blackchecker.gif">
If you are on a Windows 95/98 machine, to run telnet, do the following:
- Click Start
- Click Run
- Type telnet and press ENTER
The Telnet screen will then come up. Generally, you connect to the same address you would ftp files to your server.
Once you login with the same username and password as when you ftp files, the commands are very similar to DOS in Windows.
- cd = change directory
- ls = list files in current directory
- rm = remove / delete a file
- mv = mv a file to another location
- mkdir = make directory
If you want to untar the files yourself, simply cd into the directory you uploaded the WebChatter file, and then:
- Type gunzip webchatter.tar.gz and press ENTER (Replace the filename with the exact filename you uploaded to your server
- Type tar xvfp webchatter.tar and press ENTER NOTE: the .gz is no longer on the filename
- R. Saltman
Send us your thoughts
Questions?
Get this software title and over $8,000 of other eye-catching web software products for only $9